Grab Brush.
It allows us to grab a part of the mesh adequate to the size of the brush and move the vertices according to the set force and the direction indicated with the mouse. This is one of the few brushes that in the dynamic topology mode, i.e.
selected

does not create new geometry.
We activate the Grab Brush on the “G” keyboard, the most convenient way to do it is to use the index finger of the left hand.
Interesting fact:
G keyboard shortcut outside of Sculpt Mode, also works in Object Mode and Edit Mode.
We point in Object Mode or select an object, objects with the Left Mouse Button, we move in 3D space when we press G.
ADDITIONALLY (it will probably be more in the post about moving in 3D):
If, with the default 3D Preview set to Front (keyboard shortcut numeric keypad 1), after pressing G, we press X or Y or Z, then we move it in the axis according to XYZ. just G and then X – right – left, Y – closer – further, Z – up – down. And on the subject of moving in 3D, when G press and hold SHIFT one of the 3 XYZ dimensions, this dimension will be locked and the freedom of movement of the object will take place in the other two dimensions. It all depends on what our reference point is, the point towards which we define it is the proverbial “left right”, but this is a fairy tale for the next posts, it is set by default so that it is enough for us for now.
In Edit Mode, after pressing G, we move the previously selected vertices (keyboard shortcut “1”, edges (keyboard shortcut “2”) and surfaces (keyboard shortcut “3”). So it’s worth remembering.
Shortly, as standard, each of the fingers with the QWERTY keyboard layout (the most popular), certain fingers of both hands feel best on the combination of FDSA (left hand) and JKL: (right hand) buttons, there is a protrusion on the F and J buttons as standard, which, closing the eyes without looking allows us to quickly find a key with a finger, and easily find ourselves on the keyboard without looking.

g keyboard shortcut – grab in Blender 3D
In 1 minute 12 seconds you will learn how the Grab Brush works. The shortcut repeated many times will allow you to consolidate it very quickly.
Just remember to turn on the subtitles.
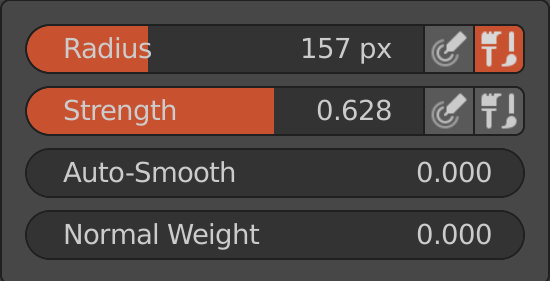
Also, after pressing the Right Mouse Button, you set the strength and size by dragging the slider to the appropriate value. There is also the Auto-Smooth option, which, depending on how it is set, takes care of automatic smoothing. The Normal Weight option specifies, if set to a high level, the lock for moving vertices in a direction other than the Normals’ direction is imposed.

Grab Brush Blender 3D
